What Is an RV Solar Battery Charger?
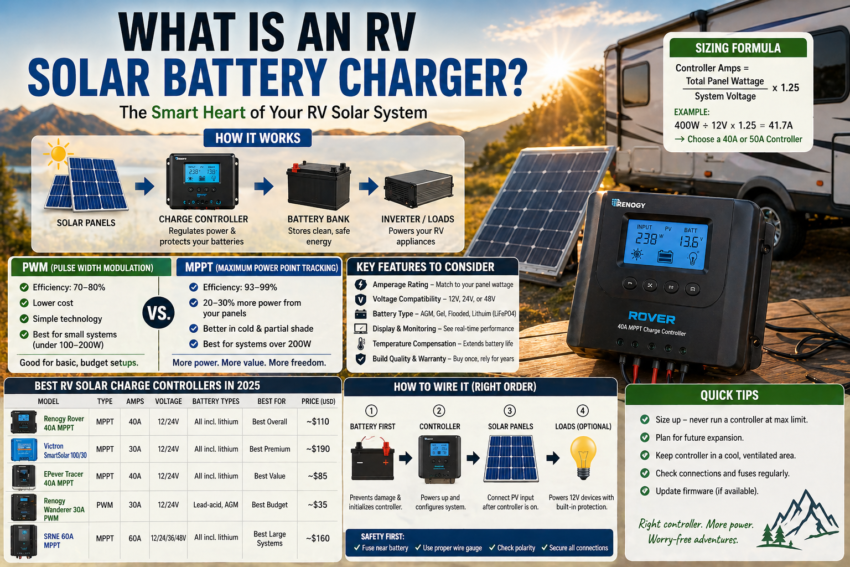
When most people talk about “RV solar battery chargers,” they’re actually talking about solar charge controllers — the device that sits between your solar panels and your battery bank. It’s one of the most important components in any RV solar system, and one of the most misunderstood.
Here’s how a basic RV solar system flows:
Solar panels → Charge controller → Battery bank → Inverter/loads
The charge controller’s job is to regulate the voltage and current coming from your solar panels and feed it into your batteries safely. Without one, the raw power from solar panels would overcharge, overheat, and potentially destroy your battery bank. It also prevents your batteries from sending power back through the panels at night — a process called reverse current flow.
Think of it as the traffic manager of your solar system. The panels generate power, the controller regulates it, and the battery stores it cleanly and safely.
MPPT vs. PWM — Which Type Do You Need?
There are two main types of solar charge controllers: PWM and MPPT. Understanding the difference is essential before you buy anything.
PWM (Pulse Width Modulation) PWM controllers are the simpler, older technology. They work by slowly reducing the power from the solar panel as the battery fills up — essentially pulsing the connection to prevent overcharge. They’re cheap, reliable, and work well in small, simple setups. The downside? They require the solar panel voltage to closely match the battery voltage, which limits efficiency — especially in cold weather or partial shade.
MPPT (Maximum Power Point Tracking) MPPT controllers are smarter. They continuously track the optimal voltage and current point of the solar panel (the “maximum power point”) and convert excess voltage into additional current for your battery. The result: 20–30% more power harvested from the same panels compared to PWM.
| Feature | PWM | MPPT |
|---|---|---|
| Efficiency | 70–80% | 93–99% |
| Panel voltage flexibility | Low — must match battery | High — works with higher voltage panels |
| Cold weather performance | Poor | Excellent |
| Cost | Low ($20–$60) | Medium–High ($80–$400+) |
| Best for | Small systems under 200W | Any system over 200W |
| Complexity | Simple | More features, more setup |
Which should you choose? For most RV systems with 200W or more of solar panels, MPPT is the clear answer. The efficiency gains pay for the price difference within one season of use. PWM makes sense only for very small, budget systems — trickle chargers, weekend-only setups, or panels under 100W.
What to Look for When Buying an RV Solar Battery Charger
Before picking a specific product, understand what the key specs actually mean.
Amperage rating This is the most important spec. The amperage rating tells you the maximum current the controller can handle from your solar panels. More amps = handles more panels. Sizing this correctly is critical — we’ll cover the formula in the next section.
Voltage compatibility Most RV systems run on 12V or 24V. Make sure your controller supports your system voltage. Many modern MPPT controllers are multi-voltage (12V/24V/48V auto-detect), which gives you flexibility to expand later.
Battery type compatibility Different batteries charge differently. Your controller needs to support your specific battery chemistry:
- Sealed Lead-Acid (SLA/AGM): Most common in older RVs, supported by virtually all controllers
- Gel: Supported by most controllers but needs a specific charge profile
- Flooded/wet lead-acid: Standard and widely supported
- Lithium (LiFePO4): Needs a controller with a dedicated lithium charge profile — not all have this
Display and monitoring A clear display showing input wattage, battery voltage, charge state, and daily/total energy generated is genuinely useful. Some premium controllers offer Bluetooth or WiFi monitoring via smartphone app — very handy for checking your system without going to the controller itself.
Temperature compensation Batteries charge at different optimal voltages depending on temperature. A controller with a temperature compensation sensor (or remote temperature probe) automatically adjusts the charge voltage — extending battery life significantly in climates that get very hot or cold.
Brand and warranty Stick to established brands: Renogy, Victron, EPever, SRNE, and Outback Power all have solid track records. Avoid no-name controllers on marketplaces — the displayed amp ratings are often exaggerated and failure rates are higher.
How to Size Your RV Solar Battery Charger Correctly
Sizing your charge controller wrong is one of the most common — and costly — mistakes in RV solar setups. Here’s the simple formula:
Controller amps needed = Total panel wattage ÷ System voltage × 1.25 (safety buffer)
Example:
- 400W of solar panels on a 12V system
- 400 ÷ 12 = 33.3A
- 33.3 × 1.25 = 41.7A → Round up to a 40A or 50A controller
More examples:
| Panel Wattage | System Voltage | Controller Size Needed |
|---|---|---|
| 100W | 12V | 10A minimum |
| 200W | 12V | 20A minimum |
| 400W | 12V | 40A minimum |
| 600W | 24V | 30A minimum |
| 800W | 24V | 40A minimum |
| 1,000W | 48V | 30A minimum |
Always size up, never down. If you’re right on the edge of a controller’s limit, buy the next size up. Running a controller at maximum capacity continuously shortens its lifespan and risks damage.
Plan for expansion. If you think you might add more panels in the future, buy a controller with headroom now. Replacing a charge controller later is more expensive and more work than buying the right size upfront.
Best RV Solar Battery Chargers in 2026
Here are the top controllers worth buying this year, covering every budget and system size.
| Model | Type | Amps | Voltage | Battery Types | Price | Best For |
|---|---|---|---|---|---|---|
| Renogy Rover 40A | MPPT | 40A | 12/24V | All incl. lithium | ~$110 | Best overall |
| Victron SmartSolar 100/30 | MPPT | 30A | 12/24V | All incl. lithium | ~$190 | Best premium |
| EPever Tracer 40A | MPPT | 40A | 12/24V | All incl. lithium | ~$85 | Best value |
| Renogy Wanderer 30A | PWM | 30A | 12/24V | Lead-acid, AGM | ~$35 | Best budget |
| SRNE 60A | MPPT | 60A | 12/24/36/48V | All incl. lithium | ~$160 | Best for large systems |
Renogy Rover 40A MPPT — Best Overall
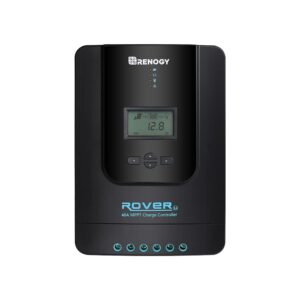
The Renogy Rover 40A is the most popular RV solar charge controller on the market for good reason. It handles up to 400W of panels on a 12V system, supports all battery types including lithium, and comes with a clear LCD display showing real-time system data. The built-in Bluetooth (on the Elite version) lets you monitor everything from your phone.
Renogy’s customer support is excellent and replacement parts are easy to find — both important considerations for a component you’ll rely on for years. At around $110, it hits the sweet spot of price, performance, and reliability.
Pros: Lithium compatible, solid display, proven reliability, Bluetooth on Elite version Cons: App could be more polished; no WiFi on standard version Best for: Most RV owners with systems up to 400W (12V) or 800W (24V)
Victron SmartSolar 100/30 — Best Premium Pick
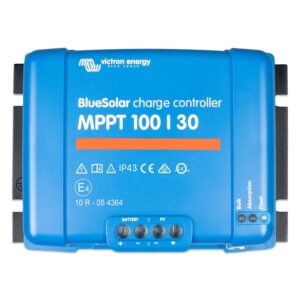
If budget isn’t the primary concern, Victron is the professional’s choice. The SmartSolar 100/30 is built to a higher standard than almost everything else in the consumer market — better components, better firmware, better long-term reliability.
The Victron app (VictronConnect) is genuinely excellent. Real-time monitoring, historical data, firmware updates, and full system configuration all happen over Bluetooth from your phone. For a complex RV system you’re building to last 10+ years, Victron is the investment that pays off.
Pros: Industry-leading build quality, exceptional app, full system integration, 5-year warranty Cons: Premium price, overkill for simple setups Best for: Serious off-grid RV builds, full-time van lifers, and anyone building a system for the long haul
EPever Tracer 40A MPPT — Best Value
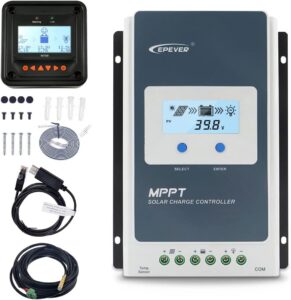
EPever doesn’t have the brand recognition of Renogy or Victron, but their Tracer series is well-regarded among the solar DIY community. The 40A unit handles the same panel loads as the Renogy Rover at a noticeably lower price point. It has a solid LCD display and supports lithium batteries.
The main trade-off is that the app and Bluetooth connectivity require an additional dongle (not included). Monitoring over phone requires an extra $15–20 purchase. Not a dealbreaker, just worth knowing upfront.
Pros: Excellent value per amp, lithium compatible, solid build quality Cons: Bluetooth requires separate dongle, less name recognition for resale Best for: Budget-conscious builders who want MPPT performance without Renogy pricing
Renogy Wanderer 30A PWM — Best Budget Pick
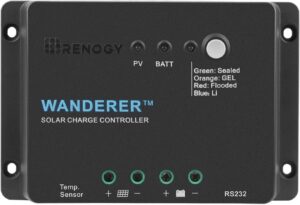
If you have a small system under 200W and you’re not ready to commit to MPPT pricing, the Renogy Wanderer is the safest budget pick. It’s a simple, reliable PWM controller that does exactly what it promises.
At $35, it’s genuinely hard to complain. It won’t win any efficiency awards, but for a weekend camper with two 100W panels and a standard lead-acid battery, it’s all you need.
Pros: Extremely affordable, reliable, simple to set up, Renogy brand backing Cons: PWM only (less efficient), no lithium support, limited display Best for: Small weekend camping setups, systems under 200W, budget-first buyers with lead-acid batteries
SRNE 60A MPPT — Best for Large RV Systems
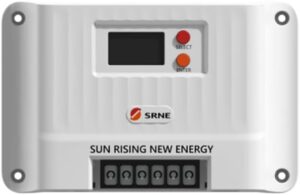
For big rigs, fifth wheels, and anyone running 600W+ of solar on a 12V or 24V system, the SRNE 60A is a serious workhorse. It handles up to 800W on 12V or 1,600W on 24V — enough for even the most power-hungry RV solar builds.
SRNE is widely used in professional off-grid installations and the 60A model comes with a clear display, lithium battery support, and temperature compensation built in. At around $160, it’s excellent value for what it handles.
Pros: High amperage for large systems, lithium compatible, temp compensation, solid build Cons: Bulkier than smaller controllers, overkill for modest systems Best for: Large Class A/C motorhomes, 5th wheels, and serious off-grid RV builds with 600W+ of panels
How to Wire an RV Solar Battery Charger
Wiring your charge controller correctly matters — both for performance and safety. Here’s the correct order:
Step 1 — Connect battery first: Always connect the battery to the controller before the solar panels. This initializes the controller correctly and prevents damage.
Step 2 — Connect solar panels: After the battery is connected and the controller has powered up, connect the solar panels. Most controllers have dedicated PV (photovoltaic) input terminals.
Step 3 — Connect loads (optional): Some controllers have a dedicated load output for directly powering 12V devices. This allows the controller to manage load cutoff if battery gets too low.
Wiring order summary: Battery → Controller → Solar panels → Loads
Wire gauge: Use appropriately sized cables based on the amperage and cable length. A common guideline: 10 AWG for runs under 10 feet at 30A; 8 AWG for longer runs or higher amperage. Undersized wires create resistance, generate heat, and lose power.
Fuse placement: Always install a fuse or breaker as close to the battery as possible on the positive wire. This is a critical safety measure — without it, a wiring fault can cause a fire.
Series vs. parallel panel wiring:
- Series: Adds voltage, keeps current the same. Good for MPPT controllers and longer cable runs.
- Parallel: Adds current, keeps voltage the same. Better for partial shade situations.
For most RV MPPT setups, series wiring is preferred — but always verify your controller’s maximum input voltage before wiring in series.
RV Solar Battery Charger Compatibility
Lithium (LiFePO4) batteries: Not all charge controllers support lithium. Lithium batteries require a specific charge profile with a higher absorption voltage and no equalization charge. Always verify lithium compatibility before buying. All five controllers in our picks above support lithium.
AGM and lead-acid: Virtually all controllers support these. Just make sure you set the correct battery type in the controller’s settings — the wrong profile will undercharge or overcharge your battery.
Voltage matching: Your controller, battery bank, and panels all need to be on the same system voltage (12V, 24V, or 48V). The panel open-circuit voltage (Voc) must stay within the controller’s maximum PV input voltage — exceeding this damages the controller instantly. Always check this before wiring.
Maintaining and Troubleshooting Your RV Solar Charger
Signs it’s working correctly:
- Battery voltage rises during daylight hours
- Controller display shows positive watts input when panels are in sun
- Battery reaches full charge (indicated by “float” mode on the display)
Common problems and fixes:
- No input from panels: Check panel connections, fuses, and that panels are in direct sunlight. Test panel voltage with a multimeter.
- Controller shows error codes: Check the manual for specific error codes — most indicate overvoltage, overtemperature, or reverse polarity.
- Battery not reaching full charge: May indicate undersized panels, shading issues, or a failing battery. Check each individually.
- Overheating controller: Ensure adequate airflow around the unit. Don’t mount it in a sealed compartment without ventilation.
Firmware updates: Smart controllers from Victron and Renogy can receive firmware updates via their apps. Keep firmware current — updates often fix bugs and improve charging algorithms.
Frequently Asked Questions
Do I need a charge controller for RV solar? Yes — always. Connecting solar panels directly to a battery without a charge controller will overcharge and damage the battery, potentially causing dangerous overheating. A charge controller is non-negotiable, even for small systems.
What size solar charge controller do I need for my RV? Use this formula: Total panel wattage ÷ system voltage × 1.25 = minimum controller amps. For example, 400W on a 12V system needs at least a 40A controller. Always round up to the next standard size.
Can I use a regular battery charger instead of a solar charge controller? No. A regular battery charger is designed for AC power from a wall outlet. Solar panels produce DC power at variable voltage — a dedicated solar charge controller is required to regulate this properly.
How many solar panels can I connect to one charge controller? It depends on the controller’s amperage rating and your panel wattage/voltage. Use the sizing formula above to calculate. You can also connect panels in series or parallel combinations — just ensure total voltage and amperage stay within the controller’s limits.
What’s the best solar charge controller for lithium batteries in an RV? The Victron SmartSolar 100/30 is the premium choice for lithium compatibility and long-term reliability. For a more budget-friendly option, the Renogy Rover 40A MPPT Elite handles lithium profiles very well and is widely trusted in the RV community.
Final Verdict — Which RV Solar Battery Charger Should You Buy?
Here’s the quick-pick guide based on your situation:
| Use Case | Best Pick |
|---|---|
| Best overall for most RVs | Renogy Rover 40A MPPT |
| Best premium / long-term build | Victron SmartSolar 100/30 |
| Best value MPPT | EPever Tracer 40A |
| Best budget / small system | Renogy Wanderer 30A PWM |
| Best for large RV systems (600W+) | SRNE 60A MPPT |
| Best for lithium batteries | Victron SmartSolar 100/30 |
Our top pick for most RV owners: Renogy Rover 40A MPPT
It handles the panel loads of most mid-size RV solar setups, works with all battery types including lithium, has a clear display, and is backed by a brand with excellent support. At $110, it’s genuinely hard to beat on value.
If you’re building a serious long-term system and budget allows, spend the extra money on the Victron. You’ll never regret it.
And if you’re just starting out with a small setup and don’t want to overthink it — the Renogy Wanderer at $35 gets the job done without breaking the bank.
The right charge controller is the foundation of a reliable RV solar system. Get this piece right and everything else falls into place.