This post contains affiliate links. If you buy through our links we may earn a small commission — at no extra cost to you. This never influences our recommendations.
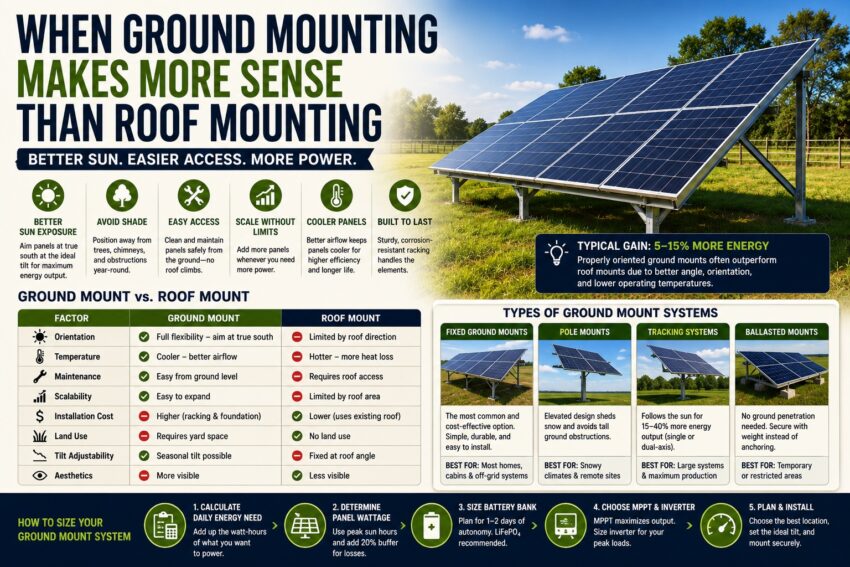
When Ground Mounting Makes More Sense Than Roof Mounting
The assumption is that solar panels go on the roof. That assumption is wrong for a surprising number of homes — and for those homes, ground mounting isn’t a compromise, it’s the better option.
Your roof faces the wrong direction. A south-facing roof at a 30°–40° tilt is ideal for solar in most of the US. An east or west-facing roof loses 15–20% of potential output. If your main roof runs east-west, your solar production will be consistently below what the system’s rated wattage suggests.
Your roof is shaded. Trees, neighbouring buildings, chimneys, and dormers create shade that dramatically reduces panel output. A ground mount can be positioned in full sun regardless of what’s shading the roof.
Your roof isn’t structurally ideal. Older roofs, flat roofs, or roofs due for replacement within 5–10 years complicate roof mounting. Removing and reinstalling panels costs $1,500–$3,000. A ground mount avoids the question entirely.
You need more capacity than the roof allows. If your energy goals require 10+ kW of solar and your usable south-facing roof area can only support 5–6 kW, a ground mount in the yard handles the difference.
Maintenance is simpler. Cleaning roof panels means ladders, harnesses, and real fall risk. Ground mount panels can be cleaned with a garden hose from standing height. Maintenance that’s easy gets done — maintenance that requires a roof climb often doesn’t.
Ground Mount vs. Roof Mount — Honest Comparison
| Factor | Ground Mount | Roof Mount |
|---|---|---|
| Orientation flexibility | ✅ Full — aim at true south at ideal angle | Limited by roof direction |
| Panel temperature | ✅ Cooler — better airflow beneath panels | Hotter — more heat loss |
| Maintenance access | ✅ Easy from ground level | Requires roof access |
| Scalability | ✅ Expand by extending the array | Limited by roof area |
| Installation cost | Higher — foundation and racking | Lower — uses existing roof |
| Land use | Requires yard space | No land use |
| Tilt adjustability | ✅ Seasonal tilt possible | Fixed at roof angle |
| Aesthetics | More visible | Less visible from street |
A properly oriented ground mount facing true south at optimal tilt typically outperforms a roof mount by 5–15% in the same location — due to better orientation, cooler operating temperatures, and the ability to adjust seasonally. The cost penalty is also real: ground mount installation typically adds $1,000–$3,000 in racking and foundation costs. For systems over 5kW, this is proportionally small. For small systems, it adds meaningfully to the per-watt cost.
Types of Ground Mount Solar Systems
Standard Fixed Ground Mounts
The most common type for residential and off-grid use. Metal racking frames are anchored to the ground — via driven posts, concrete footings, or ballast — and panels are mounted at a fixed tilt angle. Fixed mounts are simple, durable, and the most DIY-accessible type. The tilt angle is set during installation and typically adjusted seasonally (twice a year: steeper in winter to capture low sun, flatter in summer). Most consumer-grade ground mount racking on Amazon falls into this category.
Best for: Residential off-grid systems, cabins, farms, and any application where simplicity and cost-efficiency matter most.
Pole Mounts (Single-Pole and Top-of-Pole)
A single pole driven into the ground supports a rack of 4–12 panels mounted above ground level. Particularly useful in areas with heavy snow — the elevated position allows snow to slide off rather than accumulating, and elevated panels avoid shade from ground-level obstructions. Require a single deep concrete foundation for the pole.
Best for: Snowy climates, areas with tall ground-level vegetation, remote off-grid installations where a single centralized access point is preferred.
Tracking Systems (Single-Axis and Dual-Axis)
Tracking mounts follow the sun — single-axis trackers rotate east-west to track daily movement, dual-axis trackers adjust for both daily and seasonal sun position. Single-axis tracking increases annual output by 15–25%; dual-axis by 30–40%. But tracking systems add significant cost and complexity. For residential systems below 10kW, the economics rarely favour tracking over simply buying more fixed panels for the same cost.
Best for: Large utility-scale installations, or situations where land area is the limiting factor.
Ballasted Ground Mounts
No ground penetration required — the racking system sits on the surface and is held down by weight (concrete blocks or sandbags). Useful for rocky ground, high water tables, or leased land where ground penetration isn’t permitted.
Best for: Locations where post-driving isn’t possible, temporary installations, or land where ground modification is restricted.
How to Size a Ground Mount Solar System
Step 1 — Calculate your daily energy need. Add up the watt-hours of everything you want to power. A typical off-grid cabin might need 1,500–2,500Wh per day. A home running critical loads during outages might need 3,000–5,000Wh per day.
Step 2 — Determine panel wattage. Divide your daily energy need by your average peak sun hours (typically 4–5 for most of the US) and add a 20% buffer for system losses.
For 3,000Wh daily at 5 peak sun hours: 3,000 ÷ 5 × 1.2 = 720W of panels minimum
Step 3 — Size your battery bank. For off-grid systems, size for 1–2 days of autonomy. For 3,000Wh daily with a 2-day reserve using LiFePO4 batteries: 3,000 × 2 ÷ 0.95 = ~6,300Wh → two 100Ah 24V LiFePO4 batteries.
Step 4 — Size the charge controller and inverter. Always use MPPT with ground mount systems — the ability to set panels at optimal tilt means you’ll regularly generate near rated output, and a PWM controller would waste 20–30% of that. See our guide to solar charge controllers for sizing guidance.
What to Look for in Ground Mount Racking
Frame material: Aluminium is lighter, corrosion-resistant, and easier to handle — preferred for permanent residential systems. Galvanized steel is stronger and cheaper but heavier and less corrosion-resistant over decades.
Tilt angle range: For year-round optimisation, look for 15°–60° adjustment range. Your optimal summer tilt is roughly latitude minus 15°. Winter tilt is latitude plus 15°. Adjusting twice a year recovers meaningful additional annual output.
Wind and snow load rating: Standard residential racking should handle 125mph wind and 50–60 psf snow load. Check these specs carefully for high-wind or heavy-snow climates.
Panel compatibility: Most standard racking accommodates panels between 190–400W with standard aluminium frames. Larger format panels (400W+) may need specific rail spacing — verify before ordering.
Foundation type: Most consumer racking kits don’t include the foundation — budget separately for posts, concrete, or ballast blocks.
Best Ground Mount Racking on Amazon — Verified Picks
Professional-grade racking from specialist suppliers (IronRidge, Unirac, SnapNrack) is typically sold through solar distributors rather than Amazon. What’s available on Amazon is primarily residential and off-grid scale racking. Every pick below is verified in stock.
| Product | Panels Supported | Material | Tilt Range | Price |
|---|---|---|---|---|
| ECO-WORTHY 4-Panel Ground Mount | 4×200W / 3×300W / 2×400W | Galvanized Steel | 30°–60° | ~$120 |
| ECO-WORTHY Large-Scale Ground Mount | 5×400W / 6×300W / 8×200W | Galvanized Steel | 30°–60° | ~$180 |
| AIMS Power Pole Mount (6 panels) | 6×250–330W | Aluminium + SS304 | 4 preset pitches | Check Amazon |
ECO-WORTHY Upgraded 4-Panel Ground Mount — Best for Small Off-Grid Systems
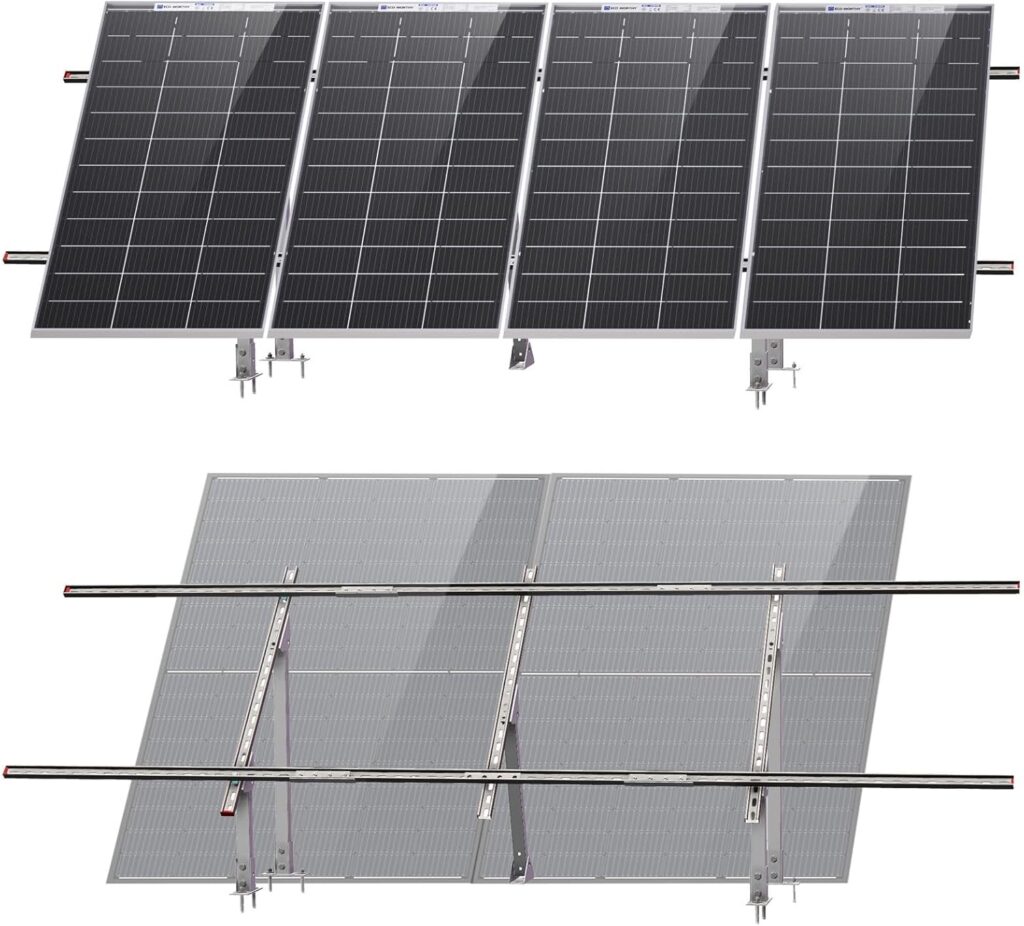
The most accessible entry point to ground-mounted solar on Amazon. The galvanized steel frame accommodates up to four 200W panels (or three 300W or two 400W), with adjustable hole positions allowing tilt between 30° and 60° — covering the full range for seasonal optimisation across most US latitudes. The beginner-friendly design includes a detailed step-by-step manual and full installation video.
The multi-triangular structure provides stability, and the system sits on the ground using concrete blocks as ballast (not included) — no post-driving or concrete pouring required. ECO-WORTHY pairs naturally with their own solar panels, making this a clean one-brand solution for a starter off-grid system. Dimensions: 118″L × 39″W.
Pros: DIY-friendly, 30°–60° adjustable, fits panels up to 400W, no concrete footings required (ballast method), 15-year warranty
Cons: Galvanized steel (less corrosion-resistant than aluminium long-term), ballast blocks not included, limited to 4 panels per unit
Best for: Cabins, sheds, off-grid homes, and first-time ground mount builders installing a 400–800W system
ECO-WORTHY Large-Scale Ground Mount — Best for Medium Off-Grid Systems
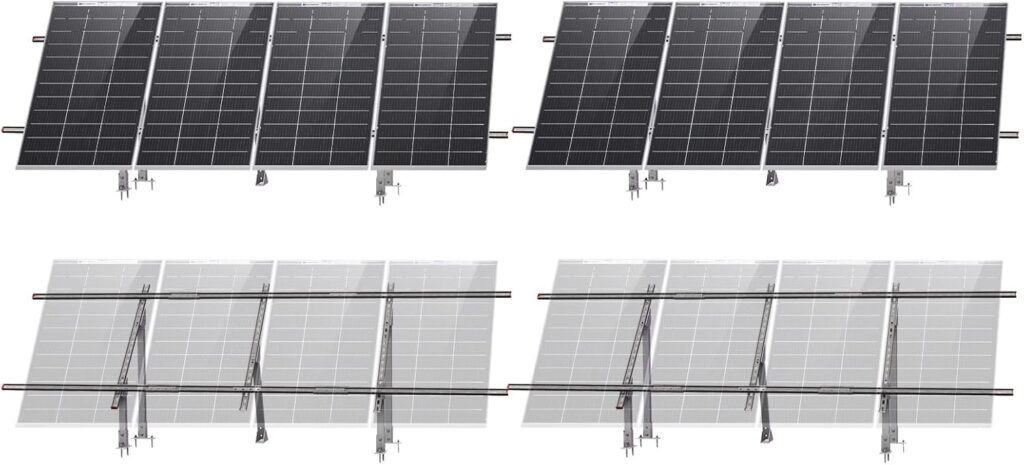
The large-scale version handles 5×400W, 6×300W, or 8×200W panels — enough for a 1,600–2,000W ground array from a single racking unit. The same 30°–60° adjustable tilt range applies, with seven preset angles for systematic seasonal adjustment. The frame supports 330 lbs without sagging, and the expandable design allows two units to be connected side-by-side for larger arrays. Upgraded support rods in the middle address the structural weak point common in wider racking systems.
Pros: Handles up to 8 panels, 330lb load rating, expandable, 30°–60° with seven preset angles, beginner-friendly installation
Cons: Galvanized steel, large footprint (236″L × 39″W), assembly requires two people, ballast blocks not included
Best for: Off-grid homes and farms needing 1–2kW of ground-mounted capacity, medium-scale cabin and workshop systems
AIMS Power PV6X250POLE Solar Pole Mount — Best for Snow and Elevated Applications
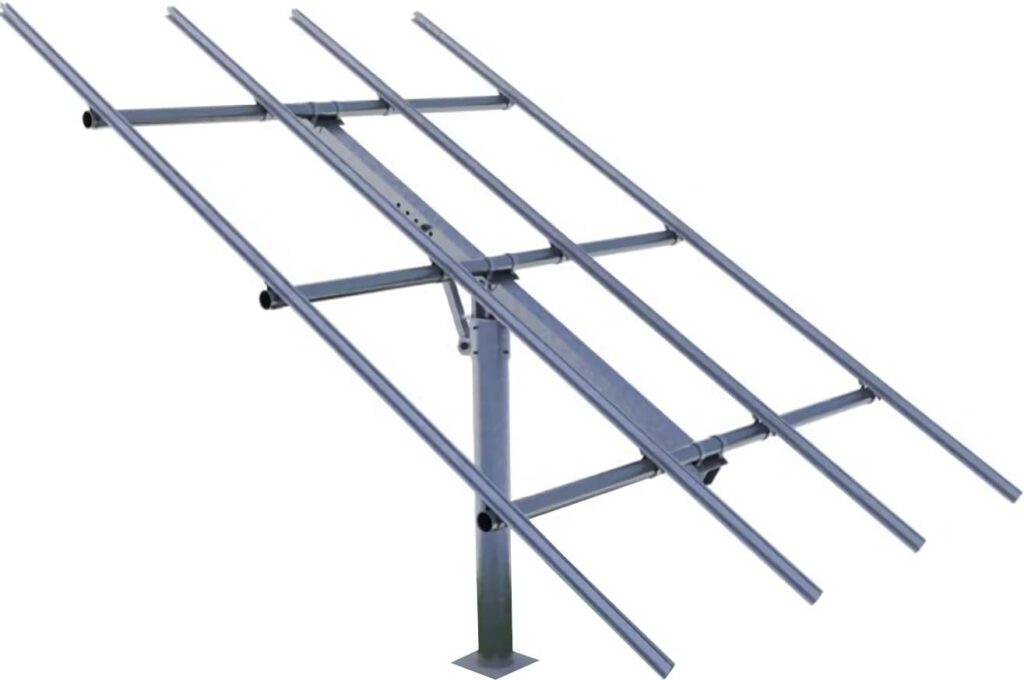
The only top-of-pole option in our verified Amazon picks. Aluminium and SUS304 stainless steel construction makes it more corrosion-resistant than galvanized steel. Accommodates 6 solar panels (250–330W) at 4 preset pitch degrees. Pre-drilled holes and modular design enable straightforward installation.
The elevated pole position is the key advantage: panels mounted 6–10 feet above ground clear snow accumulation, avoid ground-level shade from vegetation, and allow grass to grow normally beneath. The pole itself and concrete foundation are not included — budget for a 4–6 inch steel pipe and approximately 4–6 bags of concrete.
Pros: Aluminium + SUS304 stainless (most durable in our picks), elevated position clears snow and vegetation, 6-panel capacity, modular
Cons: Pole and foundation not included, only 4 fixed pitch options rather than continuous adjustment
Best for: Snow climates, northern latitudes, rural properties with tall vegetation, and anyone who prefers a single centralized mounting point
How to Install Ground Mount Solar Panels — Step by Step
- Site selection: Choose a south-facing location with no shade between 9am and 3pm. Avoid low-lying areas prone to flooding. Leave at least 3 feet clearance behind the panels for airflow and maintenance access.
- Foundation: For post-driven systems, drive steel pipes 3–4 feet into the ground (below frost line in cold climates). For ballasted systems (ECO-WORTHY), position the frame, level carefully, and add concrete blocks to the base to resist wind uplift.
- Assemble the racking: Follow manufacturer instructions. Most residential racking assembles with standard spanners and an Allen key. Set the tilt angle before mounting panels.
- Mount the panels: Secure with end clamps (outer panels) and mid clamps (inner panels). Use stainless steel hardware throughout. Torque clamps to manufacturer spec.
- Wire the array: Connect panels using MC4 connectors in the configuration your charge controller requires. Always connect the charge controller to the battery before connecting the panels. See our off-grid solar system guide for wiring diagrams.
- Run cable to the building: Use UV-resistant, direct-burial rated cable. Bury at least 6 inches deep (18 inches in frost-prone areas). Keep DC runs as short as practical — longer runs increase voltage drop.
- Permits and inspection: Check with your local building department before starting. Most jurisdictions require a permit for permanent ground mount systems.
Ground Mount Solar System Cost — What to Budget
| Component | Small (2–4 panels) | Medium (6–10 panels) | Large (12+ panels) |
|---|---|---|---|
| Solar panels | $180–$480 | $480–$900 | $900–$1,800+ |
| Ground mount racking | $100–$200 | $200–$400 | $400–$800 |
| Foundation (DIY) | $50–$150 | $100–$300 | $200–$500 |
| MPPT charge controller | $80–$200 | $150–$350 | $300–$600 |
| Battery bank (LiFePO4) | $400–$800 | $800–$2,000 | $2,000–$6,000 |
| Inverter | $100–$300 | $200–$600 | $500–$1,500 |
| Wiring, conduit, hardware | $100–$200 | $200–$400 | $400–$800 |
| Total DIY | $1,000–$2,300 | $2,100–$5,000 | $4,700–$12,000+ |
| Professional installation add | $1,500–$3,000 | $2,000–$5,000 | $4,000–$10,000+ |
Federal tax credit: The 30% Residential Clean Energy Credit applies to ground mount solar systems at owner-occupied residences — covering panels, racking, batteries, and inverters. A $5,000 DIY system yields $1,500 back on your federal taxes. Verify component eligibility and keep all receipts.
Ground Mount Solar — Off-Grid vs. Grid-Tied
Off-grid ground mount systems are the most common consumer application — a ground mount on a rural property powers a cabin, workshop, or outbuilding without utility connection. See our complete off-grid solar system guide for everything from sizing to component selection and wiring.
Grid-tied ground mount systems connect to the utility grid and feed excess power back, earning net metering credits. These require utility approval, a grid-tied inverter, and more extensive permitting — but the economics are often better than off-grid since no battery bank is required.
Grid-tied with battery backup is the premium option. If whole-home backup is the goal, see our guide to the best solar generators for home backup for the power station side of that equation.
Maintenance — Keeping a Ground Mount Running Well
Panel cleaning: The single biggest maintenance advantage of ground mounting. Dust, pollen, bird droppings, and snow reduce output by 10–25%. Ground-mounted panels can be cleaned with a garden hose from standing height — no ladder required. Clean every 4–6 weeks during pollen season and after dusty periods.
Vegetation management: Keep the area beneath and in front of the array trimmed. Gravel, landscape fabric, or low ground cover beneath the panels reduces ongoing mowing requirements.
Structural inspection: Check rail connections, clamp torque, and racking hardware annually — particularly after severe weather. Look for rust on galvanized hardware, loose connections, and any panel micro-cracking visible through the glass.
Seasonal tilt adjustment: If your racking allows it — and both ECO-WORTHY mounts do — adjust tilt twice a year. Move to steeper angle (latitude + 15°) in mid-November, back to shallower angle (latitude – 15°) in mid-March. This recovers 5–10% additional annual output compared to a fixed single angle.
Frequently Asked Questions
Are ground mounted solar panels better than roof mounted?
In terms of output potential — usually yes, modestly (5–15% more annual output). A ground mount allows optimal south-facing orientation, optimal tilt, and seasonal adjustment, and panels run cooler. In terms of installation cost — roof mount wins. Ground mount wins on long-term performance and maintenance access. The right answer depends on your specific roof and site conditions.
Do you need planning permission for ground mounted solar panels?
In the US, most jurisdictions require a building permit for permanent ground-mounted solar systems. Requirements vary significantly by state and county — some rural areas have minimal requirements for small off-grid systems, while others require full engineering drawings. Always check with your local building department before starting. Grid-tied systems always require utility interconnection approval in addition to building permits.
How far can ground mount panels be from the house?
There’s no fixed maximum, but cable distance matters. As a practical guideline, keep the array within 100–150 feet of the building. Beyond that, use larger gauge wire (6 AWG instead of 10 AWG) to compensate for resistance losses, or design the system for higher voltage to reduce current and resistance losses.
How deep do ground mount solar posts need to be?
In moderate climates: 3 feet minimum for driven posts. In frost-prone climates: posts must go below the frost line — typically 3.5–5 feet in northern US states — to prevent frost heaving each winter. Concrete footings should also be poured below the frost line. Local building codes specify minimum depths for your area.
Can you DIY a ground mount solar system?
Yes — off-grid ground mount systems are within DIY capability for most mechanically inclined homeowners. The mechanical work (assembling racking, mounting panels) is straightforward. The DC electrical work is low-voltage and safer than household electrical. Grid-tied systems are more complex and typically require a licensed electrician for the grid interconnection. Start with our off-grid solar system guide for a complete DIY framework.
Final Verdict
Ground mounting is the right choice for any home where the roof isn’t suitable for solar — wrong orientation, too much shade, structural concerns, or simply not enough space. It’s also the right choice for anyone who values easy maintenance access and the ability to expand the system without structural constraints.
For most residential off-grid applications, the ECO-WORTHY 4-panel ground mount is the most accessible starting point — adjustable, DIY-friendly, and sized appropriately for a cabin or workshop system. For larger systems, step up to the ECO-WORTHY large-scale mount. For snowy climates or elevated mounting, the AIMS Power pole mount is the most weather-resistant option.
The panels that go on the mount are covered in our guides to cheap solar panels and high efficiency solar panels. The charge controller that manages them is covered in our solar charge controller guide. And if you’re building a complete off-grid system around your ground mount, start with our off-grid solar system guide.
Ground mounting isn’t a second choice. For the right site, it’s simply the smarter choice.