
Why a Kit Makes More Sense Than Buying Parts Separately
The solar aisle on Amazon is overwhelming. Panels from 20 different brands, charge controllers in every amperage, wiring kits with connectors you’ve never seen before. Buying individual components and piecing them together works — but it takes research, time, and the genuine risk of buying parts that don’t work well together.
A solar panel kit handles that. The manufacturer has already matched the panels to the controller, sized the cables correctly, and tested the combination. You pull it out of the box knowing the core components are compatible.
For most RV owners — especially first-timers — a kit is the right starting point. You can always add more panels or upgrade the controller later. Getting the wrong individual components and having to return them is a much more expensive education.
There’s usually a cost advantage too. Bundled kits are almost always cheaper than buying the same components separately at current Amazon prices.
What’s Actually in an RV Solar Panel Kit
Not all kits include the same things. Here’s what you typically get — and what you usually don’t.
What’s included:
- Solar panels (1–8 panels depending on kit size)
- Charge controller (PWM or MPPT — more on this shortly)
- MC4 branch connectors for wiring panels together
- Adaptor cables (panel to controller)
- Tray cable (controller to battery)
- Mounting Z-brackets and hardware
What’s usually NOT included:
- Battery — the single most important omission. You need to buy this separately.
- Inverter — required if you want to run AC appliances (laptops, TVs, kitchen appliances)
- Battery monitor — useful but not essential
- Fuse/breaker between battery and controller — sometimes included, sometimes not
The battery omission catches people out regularly. You can buy a kit, mount the panels, wire everything up — and then realise you have nowhere to store the power. Budget for the battery before you buy the kit, not after.
How to Size an RV Solar Kit — Get This Right First
Buying the wrong size kit is the most common mistake. Here’s how to avoid it.
Step 1 — Calculate your daily energy use
Write down everything electrical in your RV and how many hours per day you use it:
| Device | Watts | Hours/Day | Daily Wh |
|---|---|---|---|
| LED lighting | 20W | 5 hrs | 100Wh |
| Phone charging | 15W | 2 hrs | 30Wh |
| Laptop | 60W | 4 hrs | 240Wh |
| 12V fridge | 45W | 24 hrs | 1,080Wh |
| Fan | 20W | 8 hrs | 160Wh |
| Total | 1,610Wh/day |
Step 2 — Match to a panel size
Use 5 peak sun hours as a conservative planning baseline for most of the US:
| Daily Energy Need | Panel Size | Typical Use Case |
|---|---|---|
| Under 500Wh | 100–200W | Weekend camper, minimal devices |
| 500–1,000Wh | 200–400W | Regular camping, laptop, small fridge |
| 1,000–2,000Wh | 400–800W | Full-time RV with fridge and devices |
| 2,000Wh+ | 800W+ | Full-time with AC or high-draw appliances |
Step 3 — Size the battery
You want 1–2 days of autonomy (power without sun). For 1,000Wh daily use:
- 1 day reserve: 1,000Wh ÷ 0.95 (LiFePO4 efficiency) = ~1,050Wh → 100Ah 12V lithium
- 2 day reserve: → 200Ah 12V lithium or two 100Ah batteries
The formula works. The mistake is skipping it and guessing.
MPPT vs. PWM — Which Does Your Kit Need?
Every solar kit includes a charge controller. The type matters more than most people realize.
PWM (Pulse Width Modulation) controllers are simpler and cheaper. They work, but they waste a portion of the energy your panels generate — typically 20–30% compared to MPPT. They also require your panel voltage to closely match your battery voltage. For small systems under 200W where budget is the priority, they’re acceptable.
MPPT (Maximum Power Point Tracking) controllers continuously find the optimal operating point for your panels and convert any excess voltage into additional current for your battery. In real-world conditions — partial shade, morning/evening sun, cold weather — MPPT extracts 20–30% more energy from the same panels.
For RV use, MPPT is almost always worth the upgrade. You’re investing in panels, batteries, and installation labour. Losing 20–30% of your generated power to a $30 cheaper controller doesn’t make financial sense over the life of the system.
A practical rule: If your kit is 200W or above, insist on MPPT. Below 200W with a tight budget, PWM is acceptable.
The Best RV Solar Panel Kits Right Now
Every kit below is verified on Amazon with specs confirmed from official listings.
| Kit | Wattage | Controller | Bluetooth | Daily Output* | Price | Best For |
|---|---|---|---|---|---|---|
| Renogy 200W Starter (PWM) | 200W | 30A PWM | ❌ | ~850Wh | ~$180 | Budget first kit |
| Renogy 200W MPPT Kit | 200W | 20A MPPT | ❌ | ~1,000Wh | ~$230 | Best overall starter |
| Renogy 400W Premium Kit | 400W | 40A MPPT | ✅ | ~1,600Wh | ~$450 | Best mid-range |
| Renogy 800W Premium Kit | 800W | 60A MPPT | ✅ | ~3,500Wh | ~$700 | Best full-time RV |
| ECO-WORTHY 400W Premium Kit | 400W | 40A MPPT | ✅ | ~1,600Wh | ~$220 | Best value alternative |
*Based on 5 peak sun hours, accounting for typical system losses
Renogy 200W Starter Kit (PWM) — Best Budget First Kit

The Renogy 200W Starter Kit is one of the best-selling RV solar kits on Amazon and has been for years. It’s the kit that introduces most people to solar — two 100W monocrystalline panels, a 30A PWM Wanderer controller, all the cables, branch connectors, and Z-brackets to mount on an RV roof.
The controller is PWM — which means you’re leaving some efficiency on the table compared to MPPT. But as a budget entry point with a brand that has unmatched customer support and documentation, it’s hard to fault. If you’re not sure solar is right for your RV yet, this is the lowest-risk way to find out.
Pros: Best-selling kit on Amazon, trusted Renogy brand, complete mounting hardware included, exceptional installation support, expandable up to 400W with the same controller
Cons: PWM controller loses 20–30% efficiency vs MPPT, no Bluetooth monitoring, battery not included
Best for: First-time RV solar buyers on a budget, weekend campers, and anyone wanting to test solar before committing to a larger system
Renogy 200W MPPT Kit — Best Overall Starter Kit
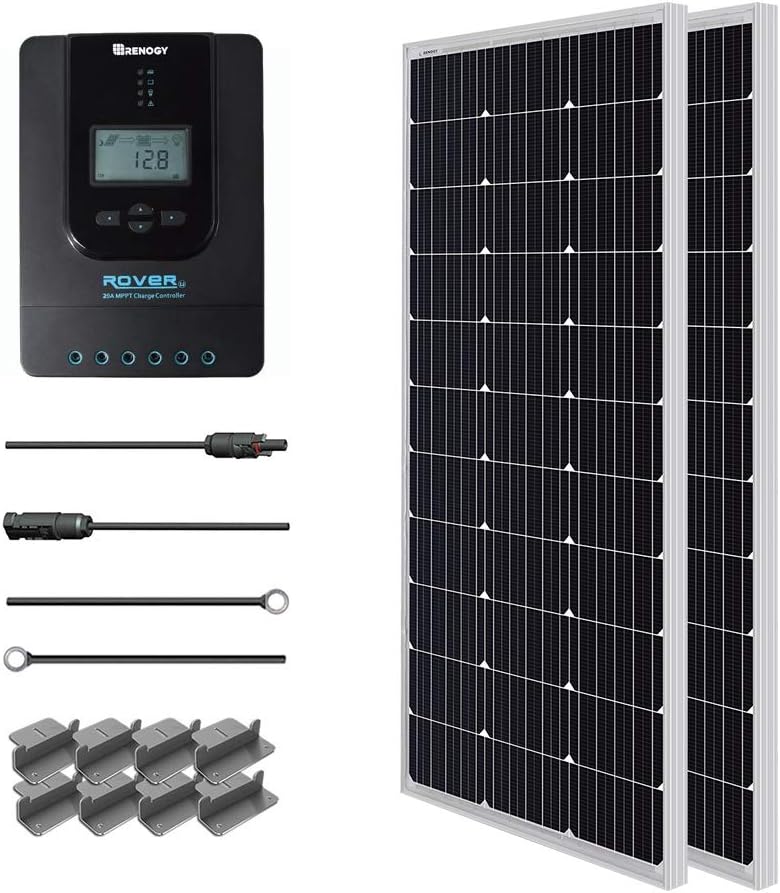
This is the 200W kit you should buy if you can stretch $50 more than the PWM version. It includes two 100W 12V monocrystalline solar panels with a 20A MPPT Rover charge controller — the key upgrade that extracts up to 30% more power from the same panels.
In real terms that’s the difference between 700Wh and 1,000Wh on a typical day. On cloudy or partial-shade days the gap is even more significant. The system is expandable up to 400W on a 24V setup using the same controller — meaning you won’t need to replace it if you add more panels later.
Pros: MPPT controller for maximum efficiency, Renogy reliability, full mounting hardware, expandable, excellent installation documentation
Cons: No Bluetooth (upgrade to Premium for that), battery not included, 20A controller limits future expansion
Best for: RVers who camp regularly and want a properly efficient starter kit they won’t outgrow quickly
Renogy 400W Premium Kit — Best Mid-Range RV Kit
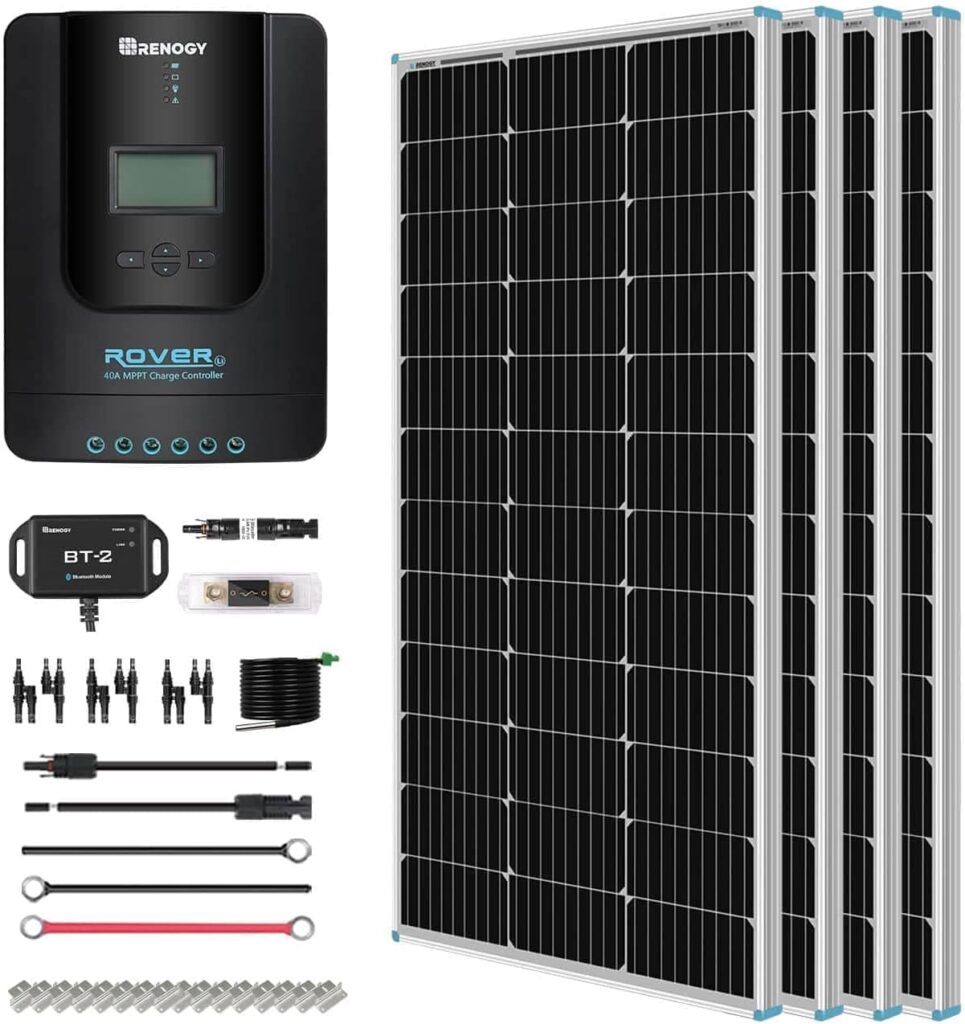
The Renogy 400W Premium Kit includes four 100W solar panels, a 40A MPPT Rover charge controller, a Bluetooth module, mounting Z-brackets, adaptor kit, tray cables, and inline fusing — one of the most complete kits available on Amazon.
The Bluetooth BT-1 module pairs with the Renogy DC Home App, giving you real-time data on input wattage, battery state of charge, output current, and historical charging data from your phone — up to 82 feet away. Being able to check your solar without going outside becomes something you use every single day.
At 400W with 5 peak sun hours you’re generating roughly 1,600Wh per day — enough to run a 12V fridge, charge all your devices, run LED lights, and have meaningful reserve left over.
Pros: 400W output covers most regular RV needs, 40A MPPT, Bluetooth monitoring included, fusing included, complete Renogy quality and support
Cons: Make sure you select the MPPT version — a PWM 400W version also exists, battery not included
Best for: Regular weekend-to-week campers, couples or families in RVs, anyone with a 12V fridge as a permanent fixture
Renogy 800W Premium Kit — Best for Full-Time RV Living
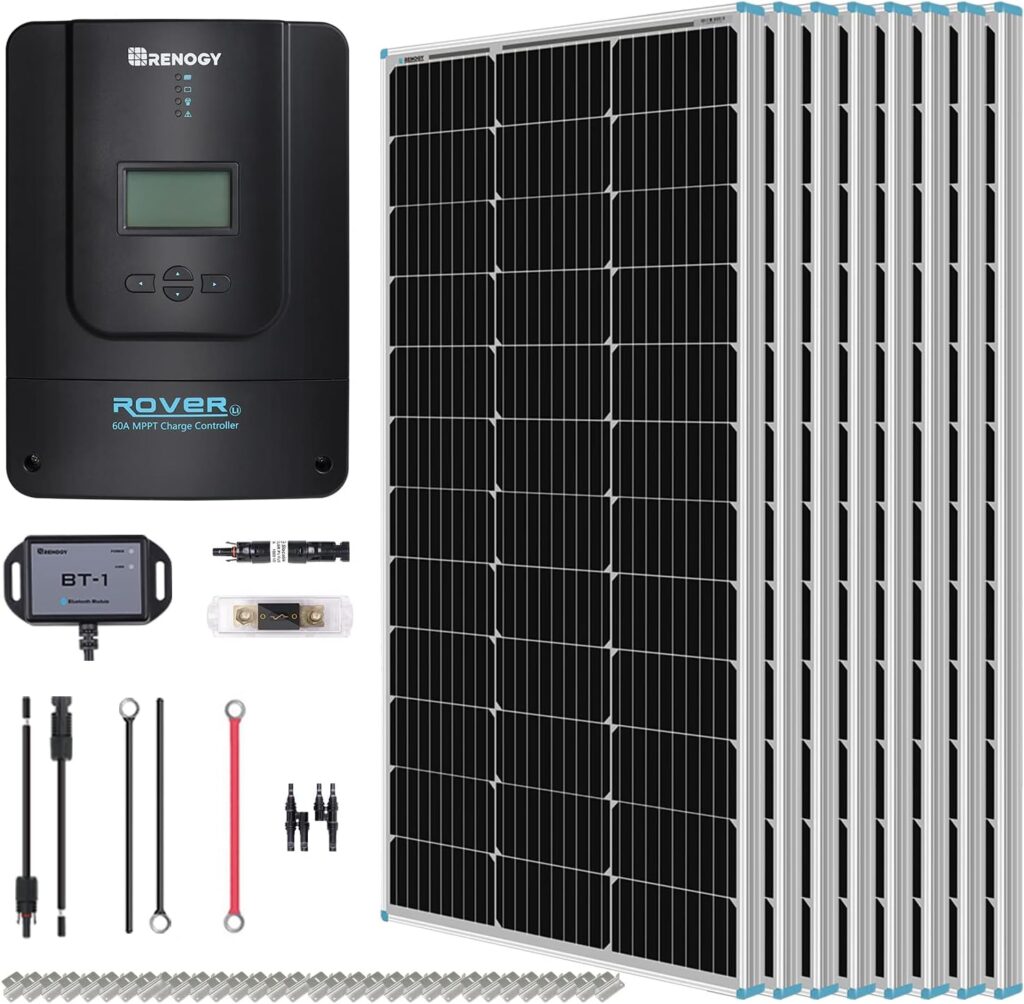
The Renogy 800W kit includes 8 x 100W solar panels and a 60A MPPT Rover Li charge controller with Bluetooth. This is serious solar for serious RVers — producing an average of 3.5–4kWh per day based on 5 hours of direct sunlight.
At that output level you start talking about offsetting large loads — television, washing machine, electric cooking. The 60A MPPT controller automatically detects 12V, 24V, 36V, or 48V systems and can be expanded further on a 24V system up to 1,600W of panels. The LCD screen and LED indicators show all system data at a glance.
3.5–4kWh daily is the threshold where most full-timers stop running a generator at all. Pair this with a 300–400Ah LiFePO4 battery bank and a 2,000W pure sine wave inverter and you have a genuinely self-sufficient RV power system.
Pros: 3.5–4kWh daily output, 60A MPPT handles the load, Bluetooth monitoring, expandable to 1,600W, all protection built in
Cons: Significant roof space required for 8 panels, higher upfront cost, battery bank needs to match (budget 200–400Ah LiFePO4 separately)
Best for: Full-time RV living, couples or families who work remotely from their RV, anyone wanting genuine off-grid independence
ECO-WORTHY 400W Premium Kit — Best Value Alternative
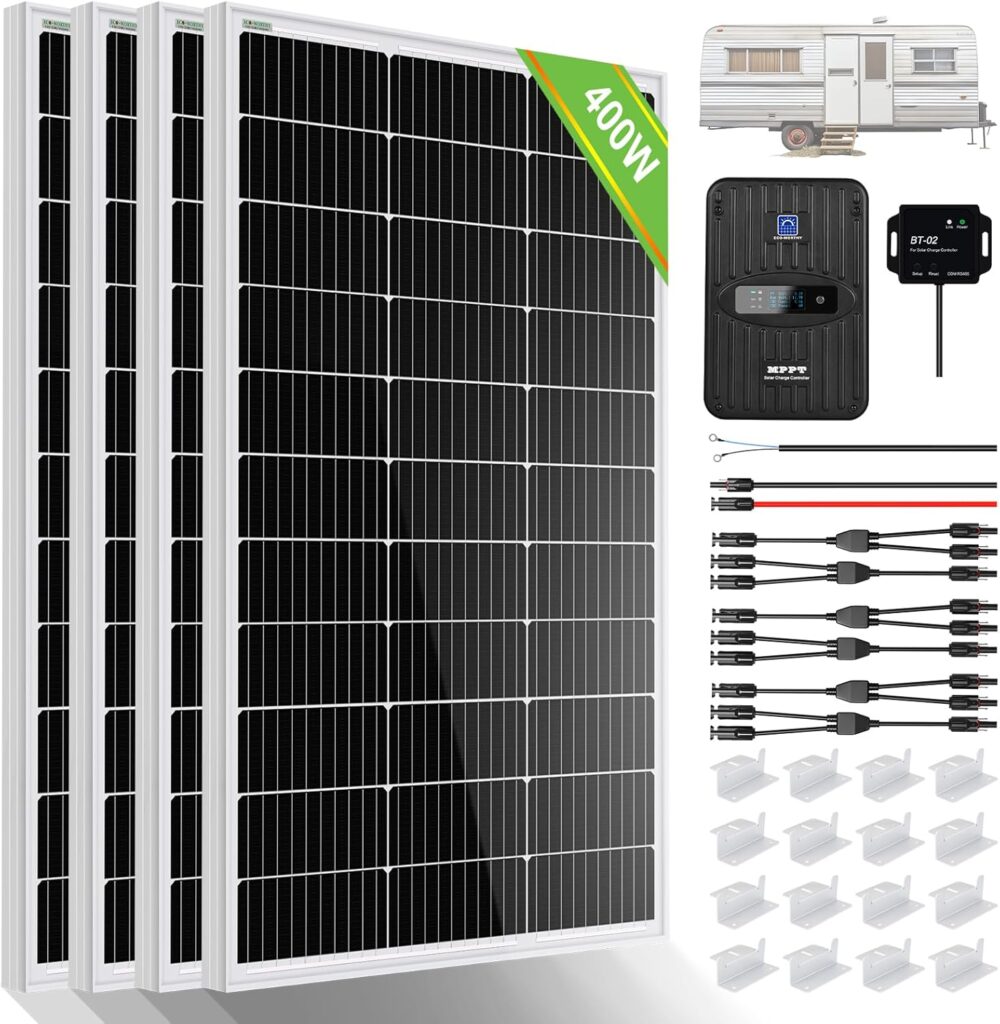
The ECO-WORTHY 400W Premium Kit is the value pick of the lineup — and it actually upgrades on what Newpowa offered in one important way: Bluetooth monitoring is included. Four 100W monocrystalline panels, a 40A MPPT charge controller, a Bluetooth module, mounting Z-brackets, MC4 cables, and Y-connectors all come in the box.
The panels use 21% efficiency monocrystalline cells with IP65-rated junction boxes and bypass diodes pre-installed to reduce power drop caused by shade. The 40A MPPT controller tracks at 99% efficiency with 98% peak conversion — the same headline numbers as the Renogy Premium kit, at a noticeably lower price. ECO-WORTHY also backs their panels with a 25-year linear power guarantee.
The trade-off compared to Renogy is thinner installation documentation and less established customer support. For buyers who are comfortable with basic solar wiring and don’t need hand-holding through setup, the ECO-WORTHY kit delivers equivalent performance at a lower cost.
Pros: Lowest price in the 400W MPPT category, Bluetooth included, 40A MPPT, bypass diodes for shade tolerance, 25-year panel warranty, complete accessories in the box
Cons: Less comprehensive support documentation than Renogy, less established brand track record
Best for: Budget-conscious buyers who want 400W MPPT performance with Bluetooth monitoring and are comfortable self-managing installation
Installation — What You’re Actually Getting Into
Roof-mounted kits (rigid panels): A half-day to full-day job depending on your experience. The basic steps:
- Clean and mark panel positions on the roof
- Secure Z-brackets using bolts or sealant adhesive
- Mount and secure panels to brackets
- Route MC4 cables through the roof using a waterproof cable entry gland
- Run tray cable from controller to battery inside the RV
- Connect battery to controller first, then panels to controller
- Configure controller battery type and test output
Tools needed: Drill, socket wrench, cable stripper, self-amalgamating tape, silicone sealant, multimeter for testing.
Portable setups: Some RVers skip roof mounting entirely — they place panels on the ground outside the RV when parked and run cables through a window or door gap. Zero installation, but harder to angle optimally. Works well for occasional campers.
Common mistakes:
- Running cables through the roof without a waterproof entry gland — water follows cables directly into your RV
- Skipping the fuse between battery and controller — this is a fire safety essential
- Connecting panels before the battery — always connect battery first to initialize the controller correctly
- Mounting panels completely flat — even a 15° tilt toward the sun meaningfully increases output
What You Still Need After Buying the Kit
Battery — the most important purchase
For RV solar, LiFePO4 (lithium iron phosphate) is the right choice for most people. More expensive than AGM lead-acid upfront, but provides 95%+ usable capacity (vs 50% for AGM), lasts 3,000–5,000 cycles vs 400–600, and is significantly lighter. Minimum recommendation: 100Ah for 200W kits, 200Ah for 400W kits.
Inverter (if running AC appliances)
If you’re only running 12V devices — fridge, lights, fan, USB charging — you don’t need an inverter. If you want to plug in a laptop charger, TV, coffee maker, or any standard AC device, you do. A 1,000–2,000W pure sine wave inverter covers most RV needs.
Battery monitor
Not essential but genuinely useful — shows real-time state of charge, current draw, and remaining runtime. Much more useful than guessing from the controller display. Renogy’s BT-2 or a Victron BMV-712 are popular choices.
Cable entry gland
If you’re roof mounting, a waterproof cable entry housing is non-negotiable. Don’t skip this — unsealed cable penetrations cause leaks. Renogy sells one specifically for their kits.
Maintenance — Keeping It Running Smoothly
Keep panels clean. Dust, pollen, and bird droppings reduce output meaningfully. A damp cloth wipe every couple of weeks keeps them at full efficiency. If you park under trees, increase frequency.
Monitor battery health. Lithium batteries rarely need attention, but watch for unusual drops in capacity or charging anomalies. The Renogy DC Home App (with Bluetooth kits) shows historical charging data that makes this easy.
Check roof penetrations. Inspect the cable entry gland and any sealant around Z-brackets every season. UV and temperature cycling degrade sealants over time — a small crack lets water in. Reseal as needed.
Lifespan: Renogy and ECO-WORTHY panels carry 25-year performance warranties. Controllers typically last 10+ years. The battery is the weakest link — replace it when capacity noticeably drops, typically after 5–10 years of regular use with LiFePO4.
Frequently Asked Questions
What size solar kit do I need for my RV?
Start with the daily energy calculation above. For weekend camping with minimal devices, 200W is often enough. For a full-time setup with a 12V fridge, laptop, and lighting, 400W is the practical minimum. Full-timers running heavier loads need 800W or more.
Can an RV solar kit run an air conditioner?
A small AC unit (5,000 BTU) draws around 500W while running. Running it even 4 hours a day needs 2,000Wh just for the AC — before everything else. To reliably run AC on solar you need 800W+ of panels, a large battery bank (300Ah+), and ideal sun conditions. It’s possible with the right setup, but most standard kits aren’t sized for it.
Do RV solar panels work while driving?
Yes. The panels generate power whenever they’re in sunlight regardless of whether the RV is moving. Driving during the day with good sun exposure is actually one of the best times for solar charging — the battery often reaches full charge before you’ve reached your destination.
What battery goes with an RV solar kit?
For 200W kits: 100Ah LiFePO4 minimum. For 400W kits: 200Ah LiFePO4 or two 100Ah in parallel. For 800W kits: 200–400Ah LiFePO4. Always use a deep-cycle battery — never a standard car starting battery, which isn’t designed for repeated charge/discharge cycles.
Is 200W enough for an RV?
For a weekend camper with modest needs — lighting, phone and laptop charging, a small fan — yes. For full-time living with a 12V fridge running 24/7, 200W will struggle. The fridge alone needs around 1,000–1,200Wh per day. 200W in 5 peak sun hours gives you about 850Wh. It’s tight. Most serious RVers find 400W is the realistic minimum for comfortable daily use.
So Which RV Solar Kit Should You Buy?
| What You Need | Best Pick |
|---|---|
| Tightest budget, first kit | Renogy 200W Starter Kit (PWM) |
| Best overall 200W kit | Renogy 200W MPPT Kit |
| Best mid-range for regular camping | Renogy 400W Premium Kit (MPPT + Bluetooth) |
| Best for full-time RV living | Renogy 800W Premium Kit |
| Best value 400W alternative | ECO-WORTHY 400W Premium Kit |
If you’re buying your first RV solar kit, start with the Renogy 200W MPPT Kit. It’s $50 more than the PWM version and generates noticeably more power. The Renogy name also means the best installation documentation in the industry — genuinely useful when you’re wiring your first solar system.
If you have a fridge running permanently and spend more than a few nights a week in your RV, step up to the Renogy 400W Premium. The jump in daily output is significant and Bluetooth monitoring quickly becomes something you wonder how you lived without.
For full-timers committed to off-grid living, the Renogy 800W is what you want. Match it with a 200Ah LiFePO4 battery and a 2,000W pure sine wave inverter and you have a system that handles real daily living without a generator.
One final thing: whatever kit you choose, buy the battery at the same time. The kit sitting on your roof produces nothing without somewhere to store the power. Size the battery alongside the panels — not as an afterthought.