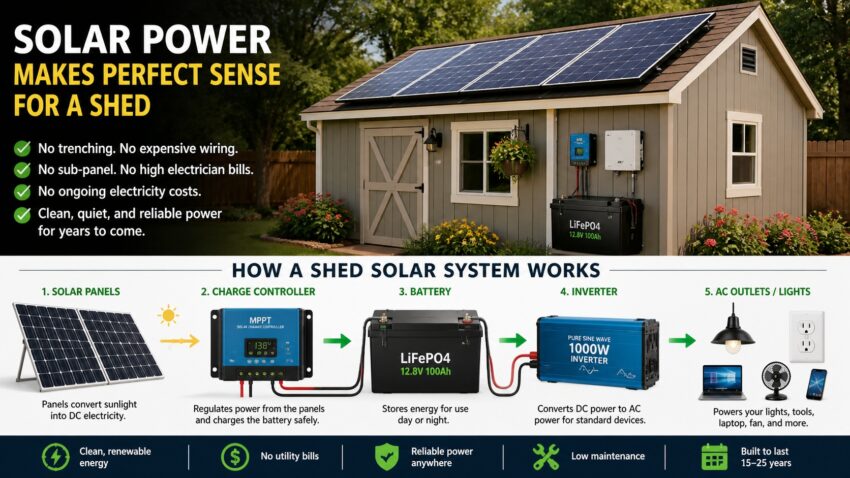
Why Solar Power Makes Perfect Sense for a Shed
Running mains electricity to a shed sounds straightforward — until you get the quote. Trenching cable underground, installing a sub-panel, hiring a licensed electrician, pulling permits — the cost adds up fast. In most parts of the US, connecting a shed to grid power runs anywhere from $1,000 to $4,000 depending on distance and local requirements.
Solar power sidesteps most of that. An off-grid solar system on a shed requires no trenching, no sub-panel, and in most cases no permit at all. You generate and store your own power, completely independent of the grid.
It’s not the right solution for every shed. If you’re running a full workshop with heavy power tools all day, you’ll want grid power or a serious solar setup. But for lighting, phone charging, a small radio, a fan, or occasional tool use — solar handles it beautifully and often at a fraction of the cost.
The sheds that benefit most from solar are ones that need modest, consistent power: garden sheds, hobby workshops, she-sheds, man caves, art studios, chicken coops, and storage sheds that need basic lighting and security cameras.
What Can You Run on Solar Power in a Shed?
Before sizing a system, it helps to know what’s realistic. Here’s a practical breakdown by shed type:
| Shed Type | Typical Power Needs | Minimum System Size |
|---|---|---|
| Basic storage shed | LED lights only | 50–100W panel + small battery |
| Garden / hobby shed | Lights, phone charging, small fan | 100–200W panel + 50–100Ah battery |
| Workshop (light use) | Lights, drill charging, radio, laptop | 200–400W panel + 100Ah battery |
| Workshop (heavy use) | Table saw, compressor, welder | 800W+ panels + large battery bank |
| She-shed / man cave | Lights, TV, laptop, mini fridge | 300–500W panel + 100–200Ah battery |
| Chicken coop / barn | Lights, heat lamp, water heater | 200–400W panel + 100Ah battery |
What solar handles comfortably in a shed:
- LED lighting — all day and night without a sweat
- Phone and tablet charging
- Laptop charging and use
- Small fans and ventilation
- Radio and Bluetooth speakers
- Security cameras
- Power tool battery charging (cordless drills, saws)
- Small TVs and monitors
- Mini fridges (with adequate battery capacity)
What needs a larger system or isn’t practical on basic solar:
- Electric heaters (too power-hungry)
- Table saws and compressors running continuously
- Welding equipment
- Air conditioning (possible, but needs a serious setup)
How Much Solar Power Does a Shed Actually Need?
Sizing a solar system correctly is the most important step and it’s simpler than most people think. Follow this process:
Step 1 — List every device you’ll use and its wattage
| Device | Watts | Hours/Day | Daily Wh |
|---|---|---|---|
| LED light × 4 | 10W | 4 hrs | 40Wh |
| Phone charger | 15W | 2 hrs | 30Wh |
| Laptop | 60W | 3 hrs | 180Wh |
| Small fan | 25W | 4 hrs | 100Wh |
| Total | 350Wh/day |
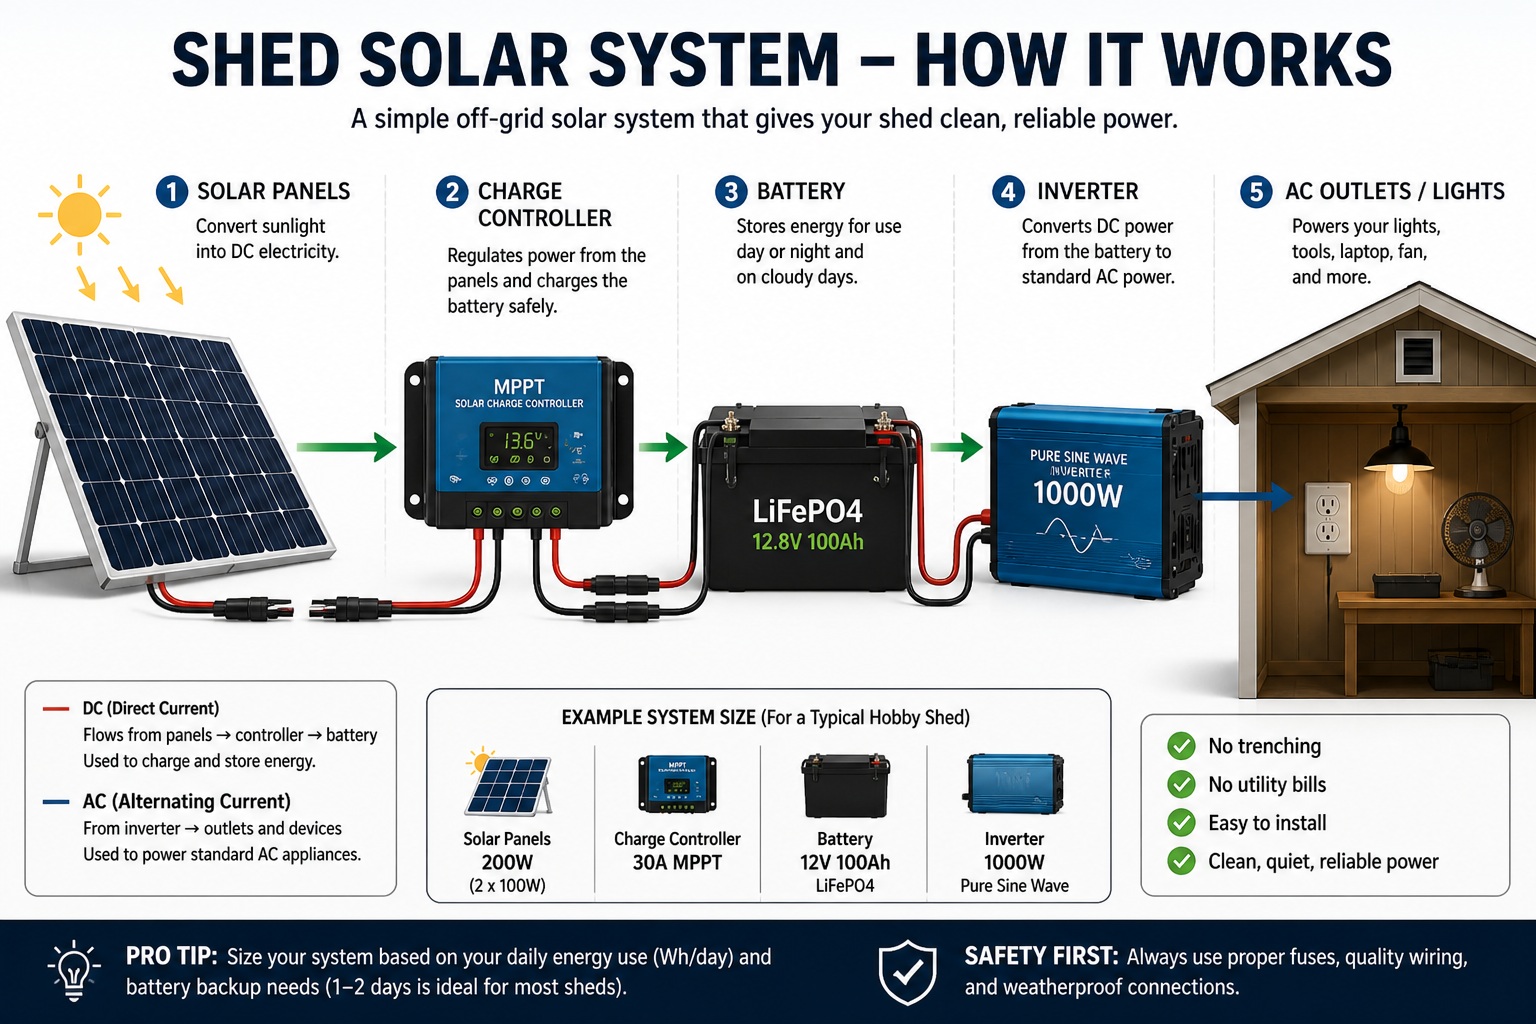
Step 2 — Size your battery
You want enough battery to cover 1–2 days without sun. For 350Wh daily use:
- 1 day backup: 350Wh ÷ 0.8 (depth of discharge) = 437Wh minimum (~50Ah at 12V)
- 2 day backup: ~875Wh minimum (~100Ah at 12V)
Step 3 — Size your solar panels
Panel wattage needed = daily Wh ÷ peak sun hours × 1.25 (losses)
Using 4 peak sun hours: 350 ÷ 4 × 1.25 = ~110W of panels minimum
Simple rule of thumb:
| Daily Energy Use | Panel Size | Battery Size |
|---|---|---|
| Under 200Wh | 100W | 50Ah (12V) |
| 200–500Wh | 200W | 100Ah (12V) |
| 500–1,000Wh | 400W | 200Ah (12V) |
| 1,000Wh+ | 600W+ | 300Ah+ (12V) |
The 4 Main Components of a Shed Solar System
Every shed solar system — no matter how big or small — has four core components. Here’s what each does and why it matters.
Solar Panels — The Power Source
Panels convert sunlight into DC electricity. For shed use, rigid monocrystalline panels are the most practical choice — they’re durable, efficient, and work well mounted on a shed roof or on a simple ground frame nearby. Panel wattage determines how much power you can generate per day. For most sheds, one or two 100–200W panels is all you need.
Charge Controller — The Regulator
The charge controller sits between the panels and the battery. Its job is to regulate the incoming power and charge the battery safely — preventing overcharge and damage. For shed solar, an MPPT charge controller is worth the extra cost over a PWM unit. It extracts 20–30% more power from your panels, which matters especially on cloudy days and in winter months. A 20A MPPT controller handles most small-to-medium shed systems. If you’re running 400W+ of panels, step up to a 40A unit.
Battery — The Storage
The battery stores the energy your panels generate during the day so you can use it at night or on cloudy days. For shed solar, a 100Ah 12V LiFePO4 battery is the sweet spot for most setups. It provides 1,200Wh of usable capacity, handles thousands of charge cycles, doesn’t require maintenance, and works well in a wider temperature range than lead-acid batteries.
Lead-acid batteries are cheaper upfront but only provide 50% usable capacity (to avoid damage), degrade faster, and need periodic maintenance. For a permanent shed installation, LiFePO4 is almost always the better long-term choice.
Inverter — AC Power (If Needed)
If you’re only using LED lights, USB charging, and 12V devices, you may not need an inverter at all. If you need standard AC outlets (110V) to plug in laptops, power tools, or appliances, you’ll need an inverter. A 300–500W pure sine wave inverter covers most light shed use. For heavier workshop loads, size up to 1,000–2,000W.
How they connect:
Panels → Charge Controller → Battery → Inverter → AC outlets/lights
Best Solar Panel Options for a Shed
Rigid monocrystalline panels are the right choice for most permanent shed installations. They’re efficient, durable, and designed to sit on a roof or frame for 20+ years. Brands to look at: Renogy, Rich Solar, HQST.
Flexible panels work well on curved or irregular shed roofs where rigid panels won’t sit flat. Slightly less efficient and shorter lifespan, but practical for specific roof types.
Portable foldable panels are great if you want a zero-installation setup — just unfold in the sun and run power into the shed. Less ideal as a permanent solution.
Top panel picks by shed size:
- Small shed (lighting only): Renogy 100W rigid — ~$90. Simple, affordable, proven.
- Medium shed (lights + laptop + fan): Renogy 200W rigid — ~$130. Great value, widely available.
- Large shed (workshop/she-shed): 2× Renogy 200W or Rich Solar 400W — ~$250–$350. Handles most loads comfortably.
Roof vs. ground mount:
Roof mounting keeps panels off the ground and avoids shading from vegetation. Ground mounting is easier to install, easier to angle correctly, and easier to clean. For small sheds with limited roof space, a ground frame nearby often works better.
Best Battery Options for Shed Solar
| Battery Type | Usable Capacity | Lifespan | Maintenance | Best For |
|---|---|---|---|---|
| Lead-acid (flooded) | ~50% | 300–500 cycles | Regular checks | Lowest budget |
| AGM (sealed lead-acid) | ~50% | 400–600 cycles | None | Budget builds |
| LiFePO4 | ~95–100% | 3,000–5,000 cycles | None | Most shed builds |
Top picks:
- Budget: Renogy 100Ah AGM (~$150) — reliable, maintenance-free, good for occasional use sheds
- Best overall: Battle Born 100Ah LiFePO4 (~$900) — premium quality, 10-year warranty, the gold standard
- Best value LiFePO4: Ampere Time 100Ah LiFePO4 (~$280) — solid build, BMS protection, great value
How much battery storage do you actually need?
Most hobby shed users do fine with 100Ah LiFePO4. Workshop users or anyone wanting to run a mini fridge overnight should step up to 200Ah. Only go bigger if your daily energy use genuinely requires it.
Do You Need an Inverter for Your Shed?
The honest answer: maybe not. Many shed solar users don’t need AC power at all.
You DON’T need an inverter if:
- You’re using 12V LED strip lights or bulbs
- You only need USB charging (phone, tablet, small devices)
- You’re using a 12V fan or ventilation system
- You’re charging cordless tool batteries via a 12V USB-C adapter
Running purely on DC is more efficient — no power is lost converting DC to AC. For a basic shed setup, skipping the inverter simplifies the system and stretches your battery further.
You DO need an inverter if:
- You’re plugging in a standard laptop charger
- You’re running AC power tools (drills, saws, grinders)
- You want standard wall outlets in the shed
- You’re running a mini fridge or any appliance with an AC plug
Inverter sizing for sheds:
- Basic use (laptop, lights, phone): 300–500W pure sine wave
- Light workshop use (small tools, drill charging): 500–1,000W pure sine wave
- Heavy workshop use (table saw, compressor): 2,000–3,000W pure sine wave
Always choose pure sine wave over modified sine wave — modified sine wave can damage sensitive electronics and reduces efficiency on motor-driven tools.
Shed Solar System Kits — Worth It or Build Your Own?
Best shed solar kits in 2025:
- Renogy 100W Starter Kit (~$150): Panel + 20A PWM controller + cables. Perfect entry point for small sheds. Add a battery separately.
- Renogy 200W Premium Kit (~$250): Two 100W panels + 30A MPPT controller + cables. Best value kit for medium sheds.
- Renogy 400W Complete Kit (~$450): Four 100W panels + 40A MPPT + wiring. Handles most serious shed setups.
| System Size | Kit Cost | DIY Component Cost | Advantage |
|---|---|---|---|
| 100W basic | ~$150 | ~$120–$150 | Similar — kit wins on convenience |
| 200W medium | ~$250 | ~$210–$260 | Similar — kit wins on time saved |
| 400W large | ~$450 | ~$380–$450 | DIY saves $50–$100 |
For most people building their first shed solar system, a kit is the smart move. The time saved researching compatibility and sourcing individual components is worth the small premium. Experienced builders who want to optimize each component are better off buying separately.
How to Install Solar Power on a Shed — Step by Step
Step 1 — Calculate your power needs
Use the daily Wh calculation method above. Write down every device, its wattage, and hours of use per day. This number drives every other decision.
Step 2 — Choose and mount your panels
Decide on roof mount or ground frame. Angle panels to match your latitude for best year-round output. Secure panels with appropriate mounting brackets — don’t just lean them against the shed.
Step 3 — Wire panels to charge controller
Run cables from the panels into the shed through a weatherproof cable entry gland. Connect to the PV input terminals on the charge controller. Use 10 AWG wire for most small shed systems.
Step 4 — Connect battery to charge controller
Connect the battery to the controller’s battery terminals. Do this before connecting the panels. Install a fuse as close to the battery positive terminal as possible — this is a critical safety step.
Step 5 — Add inverter and run to outlets and lights
Connect the inverter to the battery (if using AC power). Run wiring to your outlet boxes and light fixtures. Use junction boxes and proper connectors — don’t leave bare wire connections.
Key safety tips:
- Always fuse every positive wire close to the power source
- Use weatherproof connectors for any outdoor wiring
- Keep the battery in a ventilated space
- Label all wiring clearly for future troubleshooting
- Don’t exceed the charge controller’s max input voltage — check your panel Voc before wiring in series
How Much Does Shed Solar Power Cost?
Small shed system (lighting + phone charging):
100W panel + 20A controller + 50Ah AGM battery + basic wiring
Total: ~$200–$350
Medium shed system (lights + laptop + fan):
200W panels + 30A MPPT controller + 100Ah LiFePO4 battery + 300W inverter
Total: ~$550–$850
Large shed system (workshop / she-shed):
400W panels + 40A MPPT controller + 200Ah LiFePO4 battery + 1,000W inverter
Total: ~$1,100–$1,800
Running mains electricity to a shed typically costs $1,000–$4,000 installed plus ongoing electricity bills. A medium solar system at $700 with zero ongoing electricity cost pays for itself within 1–3 years compared to grid connection — and lasts 15–25 years with minimal maintenance.
Frequently Asked Questions
Do I need a permit for solar panels on a shed?
In most cases, no — for off-grid systems that aren’t connected to your home’s electrical system. Rules vary by state and municipality, so check with your local authority before installing. Grid-tied systems almost always require permits.
Can I add solar to an existing shed?
Yes, easily. Shed solar is designed to be retrofitted. You don’t need to modify the shed’s structure — just mount panels on the roof or a nearby ground frame and run cables inside. The whole system can be installed in a day.
How long do shed solar batteries last?
LiFePO4 batteries last 10–15 years (3,000–5,000 cycles) with proper use. AGM lead-acid batteries last 3–5 years in typical shed use. The longer lifespan of LiFePO4 makes it cheaper over the long run despite the higher upfront cost.
What’s the easiest solar setup for a shed?
The simplest possible setup: a 100W panel wired through a 20A PWM charge controller into a 50Ah AGM battery, with 12V LED lights connected directly to the battery. No inverter, no AC wiring — just plug-and-play 12V lighting. You can have this running in a few hours for under $250.
Can shed solar power run power tools?
Yes — with the right system. Cordless tool charging is easy on any medium system. For AC-powered tools like circular saws (1,200–1,800W) and compressors (1,500–2,000W), you need a 2,000W+ inverter and at least 200Ah of battery capacity. It works, but it chews through battery fast — plan your usage accordingly.
Final Verdict — What Shed Solar Setup Should You Choose?
| Shed Use Case | Recommended System |
|---|---|
| Basic lighting only | 100W panel + PWM controller + 50Ah AGM |
| Lighting + phone/laptop charging | 200W panel + MPPT controller + 100Ah LiFePO4 |
| Hobby shed / she-shed | 300W panels + MPPT controller + 100Ah LiFePO4 + 500W inverter |
| Light workshop | 400W panels + 40A MPPT + 200Ah LiFePO4 + 1,000W inverter |
| Heavy workshop | 800W+ panels + 60A MPPT + 300Ah+ LiFePO4 + 2,000W inverter |
| Easiest starter setup | Renogy 100W Starter Kit + 100Ah LiFePO4 battery |
Our recommendation for most people: Start with the Renogy 200W kit plus a 100Ah LiFePO4 battery. That combination covers 95% of shed use cases, costs around $600–$700 all-in, and gives you room to expand with more panels or battery later if your needs grow.
Solar power for a shed is one of the most practical and cost-effective solar projects you can tackle. The setup is manageable for a competent DIYer, the payback period is short, and the result is reliable, free power for the life of the shed.